

Getting started
Installation
首先我們需要用 npm 或是 yarn 安裝 content module
npm install @nuxt/content
// or
yarn add @nuxt/content
接著我們可以把模組設定到 nuxt.config.js 檔案上
export default {
  modules: [
    '@nuxt/content'
  ]
}
如果你用
create-nuxt-app建立新的專案,那麼你可以選擇要安裝 content module,這樣它會自動幫你安裝。
Let's create our markdown page
content module 會讀取專案中的 content/ 資料夾。
mkdir content
如果你用
create-nuxt-app,content資料夾也會自動建立起來。
接著建立一個 articles 資料夾,用來存放 blog 的文章。
mkdir content/articles
content module 可以讀取 markdown, csv, yaml, json, json5, xml,接著來建立第一篇 markdown 文章檔案:
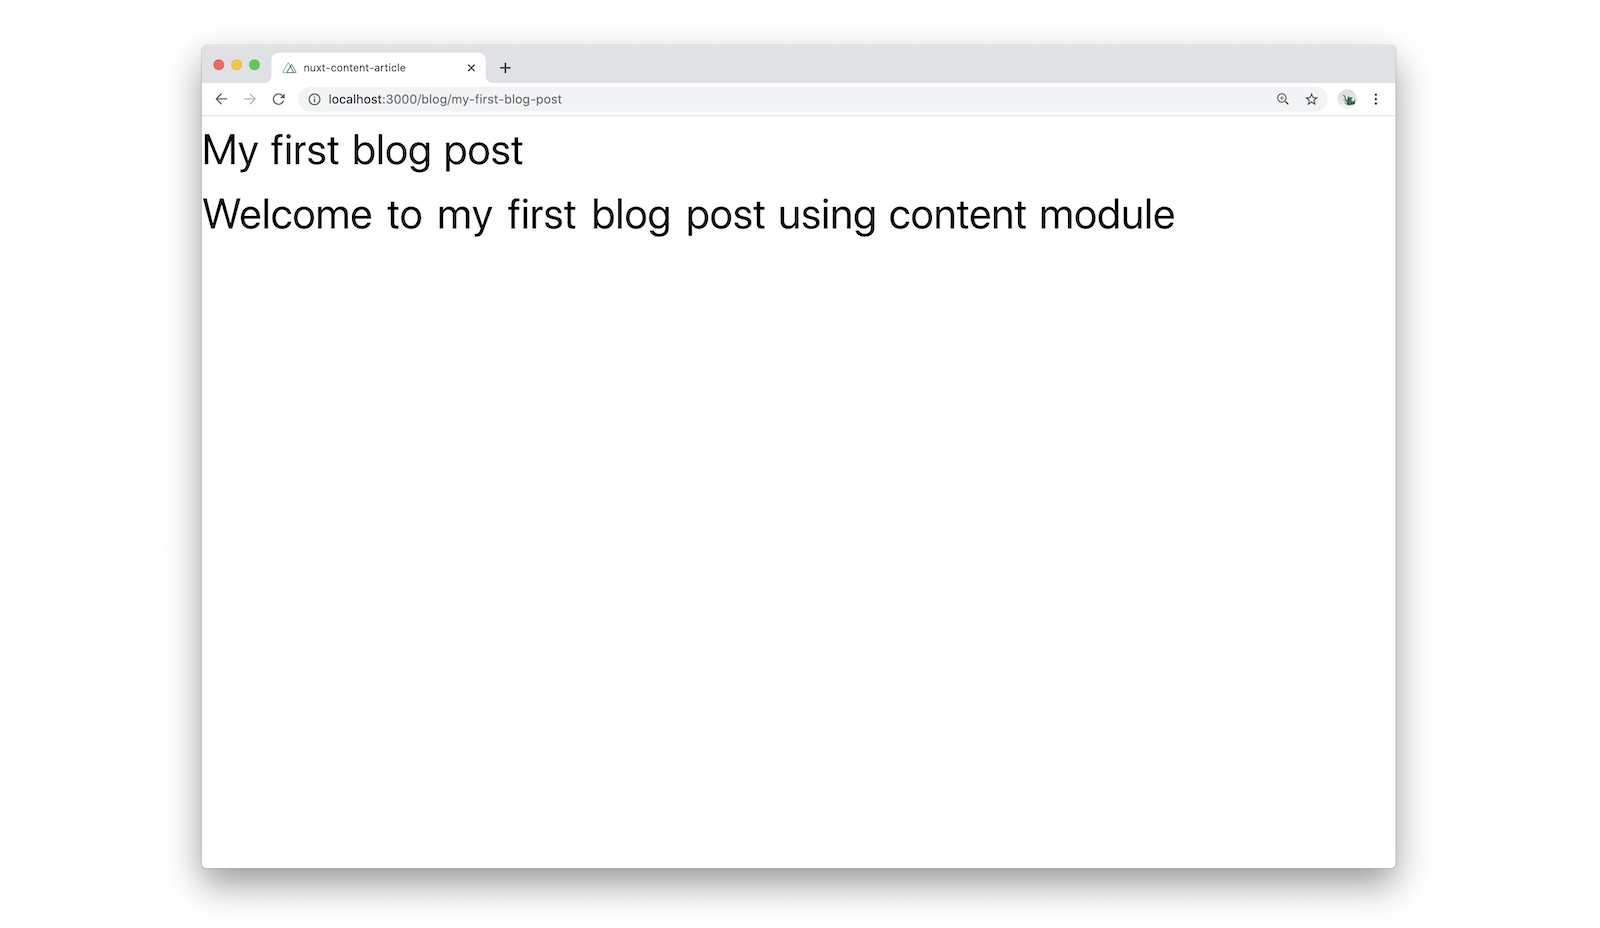
touch content/articles/my-first-blog-post.md
接著在文章上增加標題和內文
# My first blog post

Welcome to my first blog post using content module
在
markdown中我們用#產生<h1>,確定你的#跟標題之間有空白,詳細可以看這
Displaying your content
我們可以用 dynamic page 來呈現內容,在我們 page 的 blog 資料夾裡建立個頁面 component _slug.vue,我們可以用 vue router 傳來的 params.slug 來得到每個文章的 name。
touch pages/blog/_slug.vue
接著在我們頁面的 compoent 中,可以用 asyncData 來 fetch 我們的文章內容,我們可以從變數 $content 中讀取到內容,並且從 param.slug 中得知在我們的動態頁面中,要抓取哪個文章。
pages/blog/_slug.vue
<script>
export default {
  async asyncData ({ $content, params }) {
    // fetch our article here
  }
}
</script>
在我們的 asyncData 中,我們建立了一個變數 article,接著用 await fetch $content,我們用從 URL params 拿到的 slug 來告訴 $content 我們應該 fetch 哪篇文章。
pages/blog/_slug.vue
<script>
export default {
  async asyncData ({ $content, params }) {
    const article = await $content('articles, params.slug).fetch()
  }

  return { article }
}
</script>
接著用 <nuxt-content> compoent 來呈現內容,將剛剛 fetch 出來的內容當作參數 document 傳入。
page/blog/_slug.vue
<template>
  <article>
    <nuxt-content :document="article" />
  </article>
</template>
接著我們可以到 http://localhost:3000/blog/my-first-blog-post 看到我們 markdown 的內容。
Default Injected variables
content module 給了我們一些預設的屬性,讓我們可以用來呈現在頁面的 template 上。
body: body text
dir: directory
extension: file extension
path: the file path
slug: thie file slug
toc: an array containing our table of contents
createdAt: the file creation date
updatedAt: the date of the last file update
我們可以從我們之前建立的 article 拿到這些屬性。article 是一個包含這些額外屬性的物件,我們可以用 pre tag 來印出它的內容。
pages/blog/_slug.vue
<pre>{{ article }}</pre>
這樣畫面就會印出 article 物件的所有內容,以下是部份節錄:
"dir": "/articles",
"path": "/articles/my-first-blog-post",
"extension": ".md",
"slug": "my-first-blog-post",
"createdAt": "2020-06-22T10:58:51.640Z",
"updatedAt": "2020-06-22T10:59:27.863Z"
這代表我們可以在頁面中使用這些屬性,舉例來說 article.updatedAt 可以告訴我們最後的更新時間。
pages/blog/_slug.vue
<p>Post last updated: {{ article.updatedAt }}</p>
如你所見 date 很難被閱讀,所以我們可以建立個 method 用來讓 date 的格式變好閱讀。
pages/blog/_slug.vue
methods: {
  formatDate(date) {
    const options = { year: 'numeric', month: 'long', day: 'numeric' }
    return new Date(date).toLocaleDateString('en', options)
  }
}
這樣就可以在我們頁面的 template 上顯示好閱讀的日期格式。
pages/blog/_slug.vue
<p>Article last updated: {{ formatDate(article.updatedAt) }}
Custion Injected variables
我們也可以新增自定義的屬性,只要在我們的 markdow 檔案前面新增 YAML 區塊,它必須在檔案的最前面,而且是用 --- 包住,這方法對於 SEO 要用的屬性很有幫助,例如文章的 title, description, image 等。
content/articles/my-first-blog-post.md
---
title: My first Blog Post
description: Learning how to use @nuxt/content to create a blog
img: first-blog-post.jpg
alt: my first blog post
---
現在我們的 article 物件有了 title, description, img, alt 屬性可以用了。
pages/blog/_slug.vue
<template>
  <article>
    <h1>{{ article.title }}</h1>
    <p>{{ article.description }}</p>
    <img :src="article.img" :alt="article.alt" />
    <p>Article last updated: {{ formatDate(article.updatedAt) }}</p>

    <nuxt-content :document="article" />
  </article>
</template>
Styling our markdown content
如果用開發工具看我們的 markdown 轉出來的 content,可以發現它們它們他們都是帶有 nuxt-content class 的 html tag。這代表了我們可以很簡單的新增 style 到我們的內容上。
pages/blog/_slug.vue
<style>
  .nuxt-content h2 {
    font-weight: bold;
    font-size: 28px;
  }
  .nuxt-content h3 {
    font-weight: bold;
    font-size: 22px;
  }
  .nuxt-content p {
    margin-bottom: 20px;
  }
</style>
所有其他從 YAML 來的 tag 可以像一般元素一樣被 style,無論你要用 TailwindCSS,或是單純新增 css 在 style tag。
scoped style 無法作用在
nuxt-contentcomponent,所以你不應該 scoped,你可以選擇把 css 加在這邊或是 global css 的地方。
Adding an icon to our headings anchor
在我們的 h2 tag 中有一個連結到自己的錨點 a tag,以及有個 icon 和 icon-link class 的 span tag 在裡面。這對於連結頁面中的 section 很有幫助。在 title 的 link 是隱藏的因為內容是空的,所以我們用 icon class 來為它增加點 style,我們可以為他添加個 svg 背景圖。你得新增 svg 在 assets/ 資料夾中,在這個例子裡我使用了 Steve Schoger's Hero Icons 裡的 icon。
pages/blog/_slug.vue
.icon.icon-link {
  background-image: url('~assets/svg/icon-hashtag.svg');
  display: inline-block;
  width: 20px;
  height: 20px;
  background-size: 20px 20px;
}
Add a table of contents
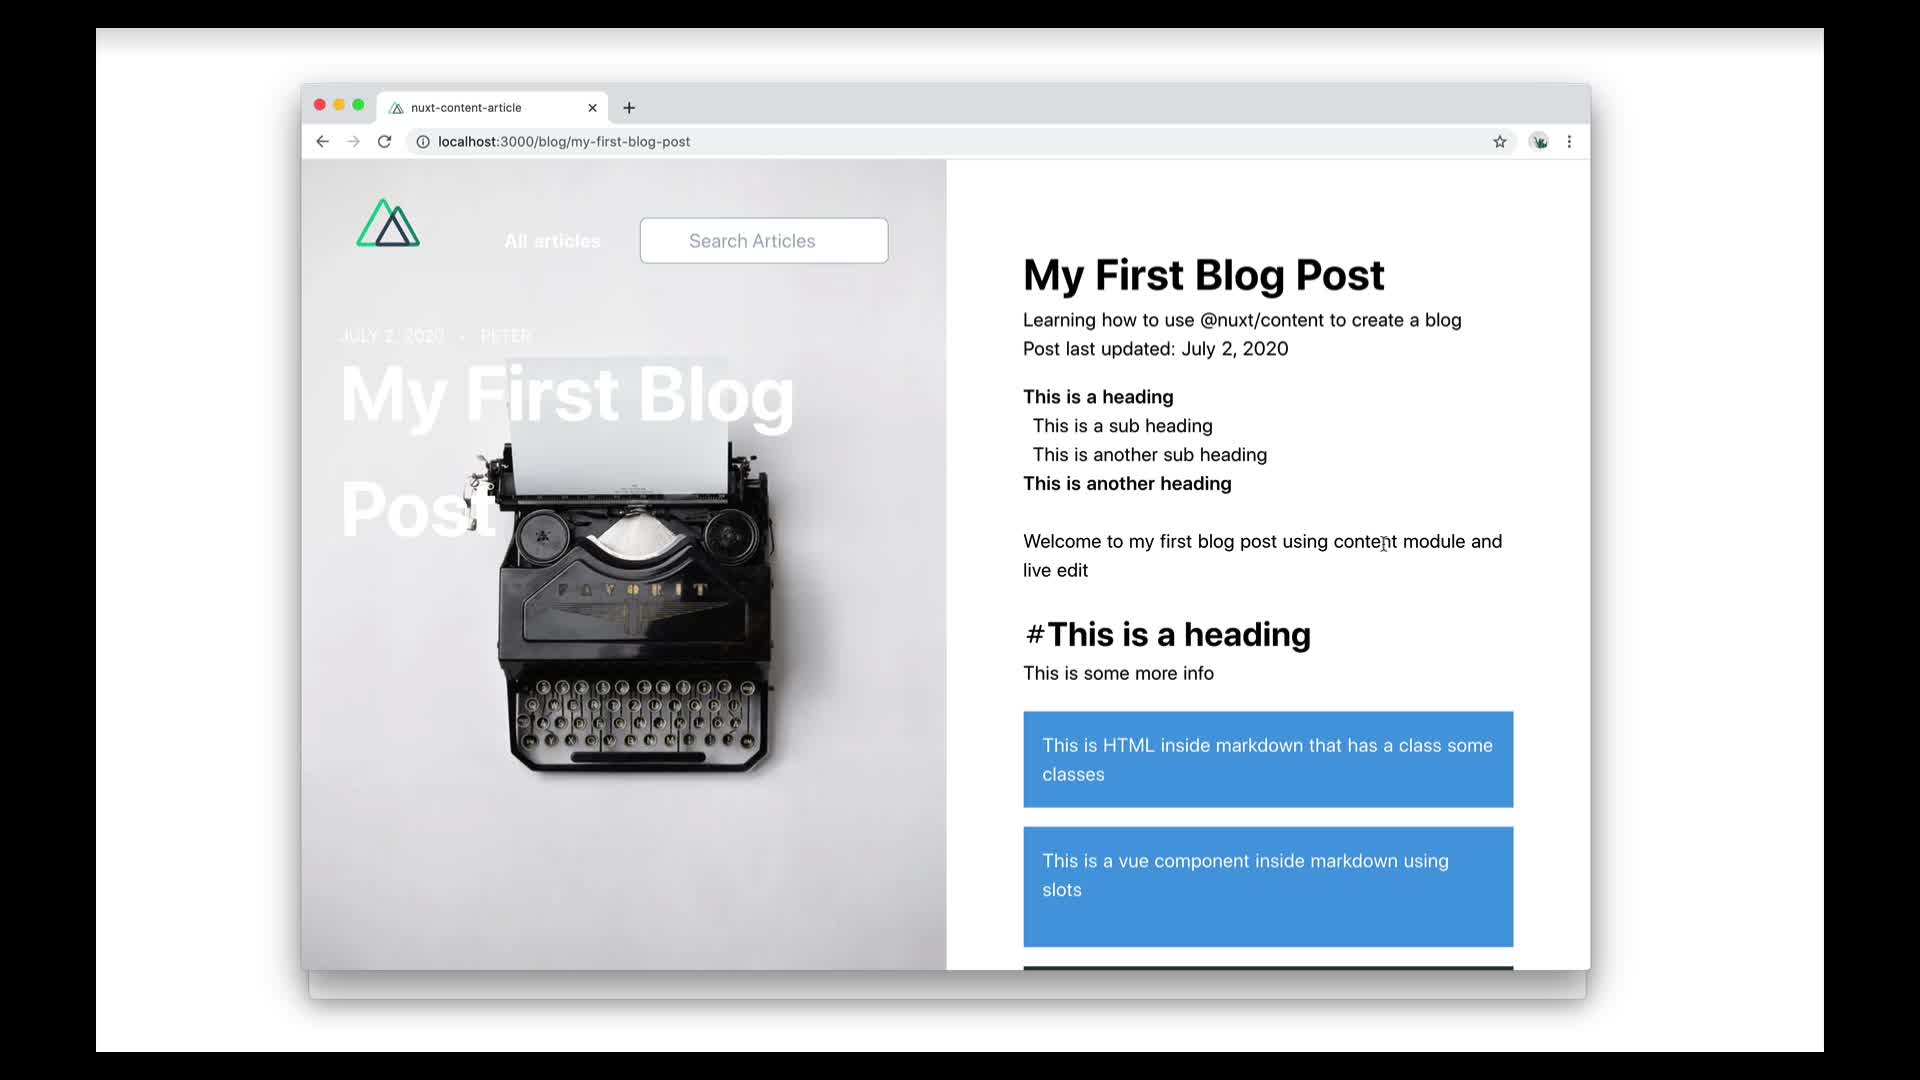
自動產生的 toc 屬性可以讓我們增加內容 table 區塊,先讓我們在文章內新增一些標題
## This is a heading
This is some more info

## This is another heading
This is some more info
現在我們可以在 toc array 裡面看到新的標題,有 id, depth, text,depth 代表的是標題 tag <h2> = 2, <h3> = 3 以此類推。
content/articles/my-first-blog-post.md
## This is a heading
This is some more info

### This is a sub heading
This is some more info

### This is another sub heading
This is some more info

## This is another heading
This is some more info
我們可以用個 loop 遍歷 toc 的 text 並把他們印出來,並且用 <NuxtLink> component 來連結這些 id。
pages/blog/_slug.vue
<nav>
  <ul>
    <li v-for="link of article.toc" :key="link.id">
      <NuxtLink :to="`#${link.id}`">{{ link.text }}</NuxtLink>
    </li>
  </ul>
</nav>
現在 toc 的連結就產生出來了,並且點了連結可以正確地跳到正確的區塊,content module 會自動的為每個標題增加 id 跟 link,如果用開發工具看我們的標題,會看到 <h2> tag 都擁有自己的 id,這跟 toc 裡面的 id 是一致的。
此外我們還可以增進我們的標題 style,如果它是 depth 2,那我們在 y 軸增加 padding,如果 depth 是 3 那我們增加 margin-left 以及 padding-bottom,下面是用TailwindCSS的範例。
pages/blog/_slug.vue
:class="{
  'py-2': link.depth === 2,
  'ml-2 pb-2': link.depth === 3
}"
Use HTML into your markdown files
有時候我們可能會想直接在 markdown 裡面加 HTML,那麼就在 markdown 中加入一個藍色背景色,白色字帶點 margin 跟 padding 的<div>。
content/articles/my-first-blog-post.md
<div class="bg-blue-500 text-white p-4 mb-4">
  This is HTML inside markdown that has a class of note
</div>
Adding a Vue component
我們也可以在 markdown 中用 Vue components,這代表這些 components 像是 info 或是 alert box 可以只 style 一次然後把文字區塊填入 slot 裡面。
現在我們只要把 components 屬性設成 true,就可以自動的把 components 定義到專案裡。(NuxtJS v2.13+)
nuxt.config.js
export default {
  components: true
}
自動 import 的 component 無法被 <nuxt-content> 使用,除非 component 是全局註冊,所以我們在建立一個 global 資料夾
mkdir components/global
接著我們把 InfoBox component 建立在這資料夾裡面
components/global/InfoBox.vue
<template>
  <div class="bg-blue-500 text-white p-4 mb-4">
    <p><slot name="info-box">default</slot></p>
  </div>
</template>
然後在我們的 markdown 裡面就可以使用這個 component
content/articles/my-first-blog-post.md
<info-box>
  <template #info-box>
    This is a vue component inside markdown using slots
  </template>
</info-box>
全局註冊的 component 將會在整個專案都可以用,請小心地使用。
Adding an Author component with props
使用 YAML 屬性還有個好處就是我們可以用它當作 component 的 props,先在我們的 markdown 裡面新增作者的 name, bio, image 等屬性。
content/articles/my-first-blog-post.md
---
author:
  name: Benjamin
  bio: All about Benjamin
  image: https://images.unsplash.com/.....
---
接著建立個 author component
touch components/global/Author.vue
components/global/Author.vue
<template>
  <div>
    <img :src="author.img" />
    <div>
      <h4>Author</h4>
      <p>{{ author.name }}</p>
      <p>{{ author.bio }}</p>
    </div>
  </div>
</template>

<script>
export default {
  props: {
    author: {
      type: Object,
      required: true
    }
  }
}
</script>
文章裡的範例,樣式都被移除了,歡迎自己添加或是從範例中複製。
接著在頁面裡新增作者 compoent
pages/blog/_slug.vue
<template>
  <article>
    <h1>{{ article.title }}</h1>
    <p>{{ article.description }}</p>
    <img :src="article.img" :alt="article.alt" />
    <p>Article last updated: {{ formatDate(article.updatedAt) }}</p>

    <nuxt-content :document="article" />

    <author :author="article.author" />
  </article>
</template>
Adding a code block to your post
用 content module 時我們可以用自動包含的prismJS來 style 程式碼區塊。
content/articles/my-first-blog-post.md
```js
export default {
  nuxt: "is the best"
}
<p>code styling is easy</p>
}
We can also add the file name of the code block by adding it inside square brackets after the code block's language.

```markdown
```js[my-first-blog-post.md]
export default {
  nuxt: "is the best"
}
The filename will be converted to a span with a filename class which we can then style how we like. For this example I am using tailwind classes but you can use ordinary CSS if you prefer.

`assets/css/tailwind.css`

```css
.nuxt-content-highlight {
  @apply relative;
}
.nuxt-content-highlight .filename {
  @apply absolute right-0 text-gray-600 font-light z-10 mr-2 mt-1 text-sm;
}
prismJS 有很多 theme 可以選用,我們可以安裝並且在 nuxt.config.js 中添加設定。
nuxt.config.js
content: {
  markdown: {
    prism: {
      theme: 'prism-themes/themes/prism-material-oceanic.css'
    }
  }
}
Creating a previous and next component
現在我們擁有了幾乎完整的 blog 頁面了,但仍然不夠好,因為使用者很難從這一篇連接到下一篇,首先我們先複製我們原本的文章,接著建立新的 component 來連接到前一篇與後一篇。
touch components/PrevNext.vue
在這 component 中,我們用 v-if 在我們的 NuxtLink 上面,用來判斷是否有前一篇或後一篇文章,我們可以從 prev 和 next 屬性中拿到文章的所有資訊,這代表我們可以建立個有文章標題,圖片,敘述的卡片樣式來導聯結。
components/PrevNext.vue
<template>
<div class="flex justify-between">
<NuxtLink
v-if="prev"
:to="{ name: 'blog-slug', params: { slug: prev.slug } }"
class="text-primary font-bold hover:underline"
>
{{ prev.title }}
</NuxtLink>
<span v-else> </span>
<NuxtLink
v-if="next"
:to="{ name: 'blog-slug', params: { slug: next.slug } }"
class="font-bold hover:underline"
>
{{ next.title }}
</NuxtLink>
<span v-else> </span>
</div>
</template>
在 component 中,我們傳入 prev 和 next 來讓他們出現在我們的 blog 頁面中。
components/PrevNext.vue
<script>
export default {
  props: {
    prev: {
      type: Object,
      default: () => null
    },
    next: {
      type: Object,
      default: () => null
    }
  }
}
</script>
現在我們可以從 asyncData 來拿到我們想要的前一篇以及後一篇文章,宣告個 const array prev 和 next,然後因為我們只要 title 和 slug 所以我們可以用 only method。
我們可以用 sortBy() 方法來讓文章是照著 createAt 的日期排序,接著再用 surround() 方法來拿到正確的前後篇文章。
接著再如同 article 般回傳 prev 和 next。
pages/blog/_slug.vue
async asyncData({ $content, params }) {
  const article = await $content('articles', params.slug).fetch()

  const [prev, next] = await $content('articles')
    .only(['title', 'slug'])
    .sortBy('createdAt', 'asc')
    .surround(params.slug)
    .fetch()

  return {
    article,
    prev,
    next
  }
},
現在我們可以在我們的 slug 頁面增加 <prev-next> component 並把 prev 和 next 傳入
pages/blog/_slug.vue
<template>
  <article>
    <h1>{{ article.title }}</h1>
    <p>{{ article.description }}</p>
    <img :src="article.img" :alt="article.alt" />
    <p>Article last updated: {{ formatDate(article.updatedAt) }}</p>

    <nuxt-content :document="article" />

    <author :author="article.author" />

    <prev-next :prev="prev" :next="next" />
  </article>
</template>
Working with the API
content module 有建立 API 介面給大家查詢,在 dev 模式下 API 在 http://localhost:3000/_content/,在我們的範例中,它會是空的,因為我們的文章是放在 articles 資料夾裡,所以我們要在這個連結 http://localhost:3000/_content/articles 查看我們的文章列表。
只要查詢他的 slug,就可以單獨查看文章,http://localhost:3000/_content/articles/my-first-blog-post
你可以使用像是JSON Viewer Awesome的 chrome 外掛來讓呈現結果更好閱讀。
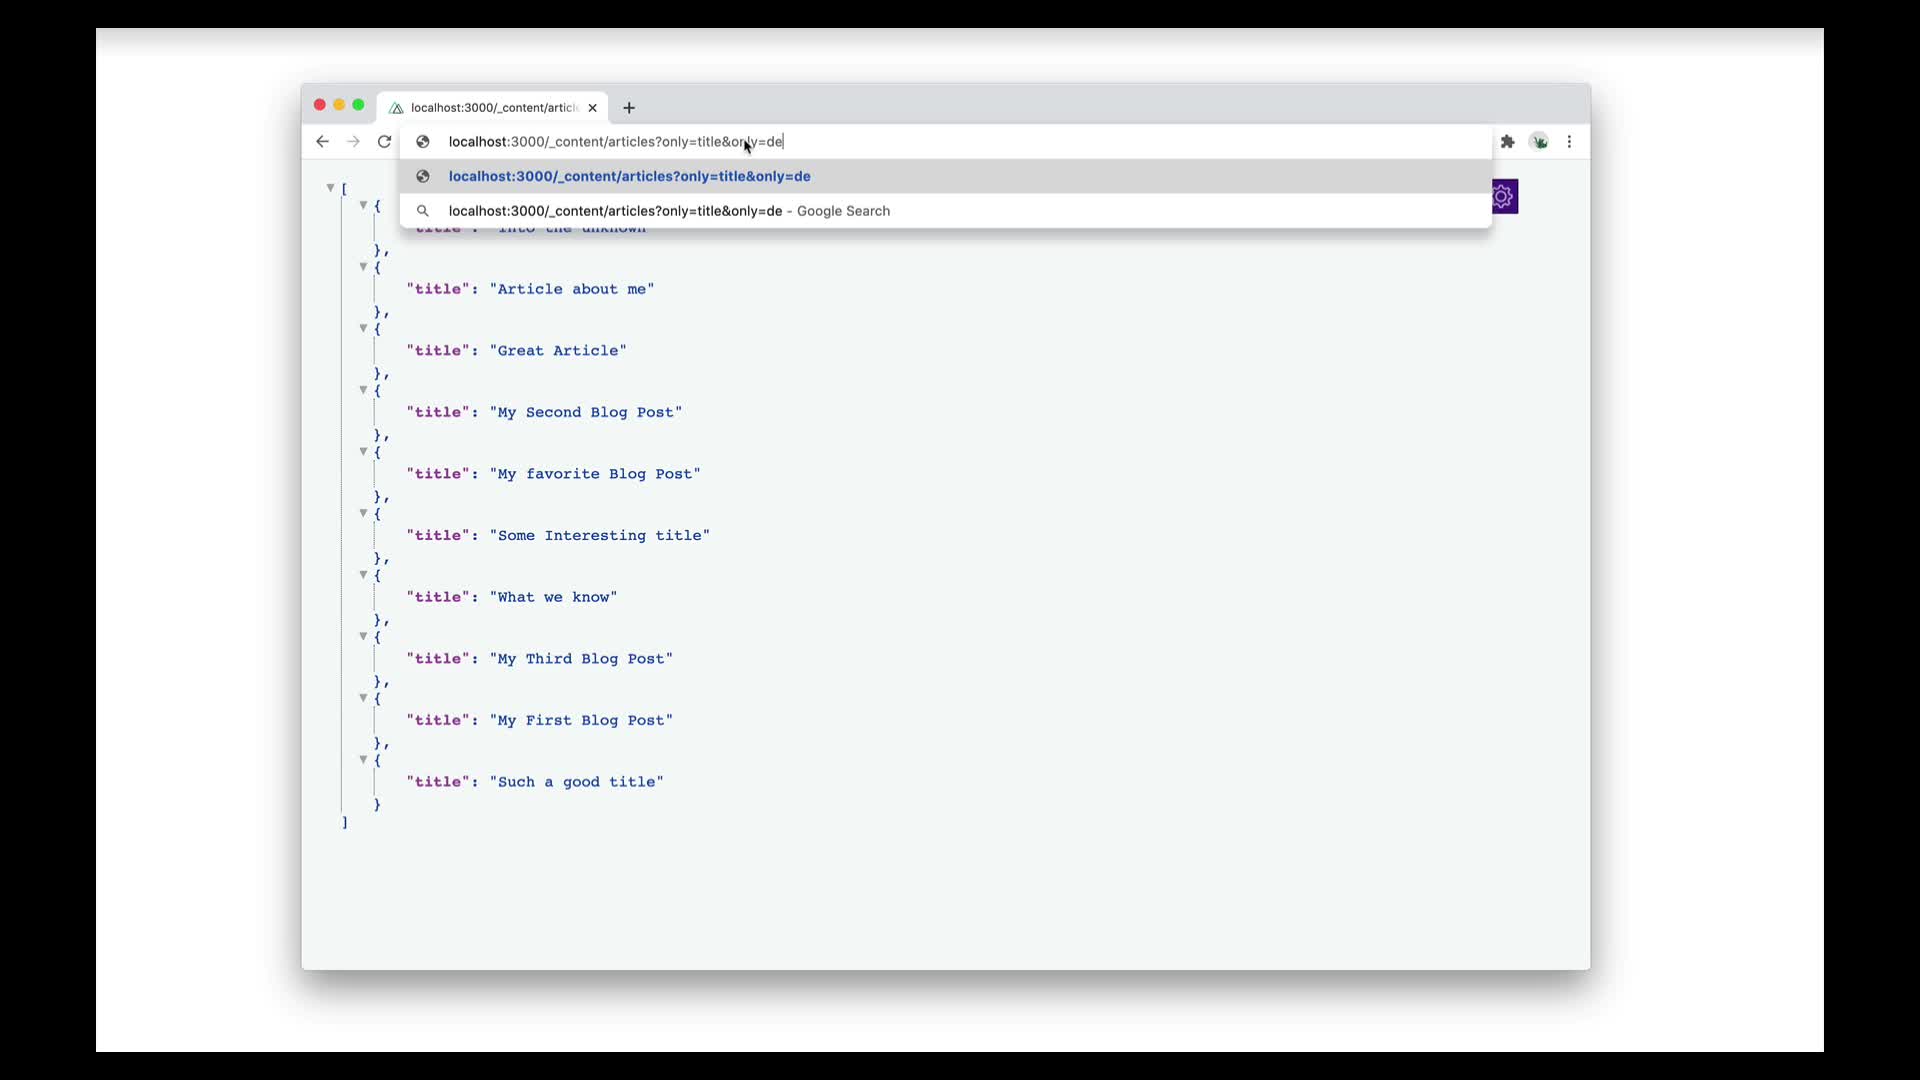
現在我們可以直接在 url 下 query 並且直接在頁面上看到 JSON 的結果,現在我們要一個全部 blog post 的列表,並且屬性只要 title, description, img, slug, author,讓我們來看看結果吧。
http://localhost:3000/_content/articles?only=title&only=description&only=img&only=slug&only=author
List all the blog posts
現在我們可以建立我們的 blog 索引頁來列出所有的文章,nuxt 建立的時候已經有 index 頁面,只要把範例 code 刪掉就好。
在 demo code 中,我使用了主要的 index page 當作 blog 索引頁,而不是在 blog 中建立一個
index.vue,因為在這 demo 中只會有這個索引頁,但在其他專案裡你通常會有 home page, contact page 等等。
用 asyncData 傳入的 $content 以及 params,接著建立一個 articles 用 only() 來讓傳回的只有 title, description, img, slug, author,用 sortBy() 讓他照著日期排序,用 fetch() 來取得回傳資料。
page/blog/index.vue
<script>
export default {
  async asyncData({ $content, params }) {
    const articles = await $content('articles', params.slug)
      .only(['title', 'description', 'img', 'slug', 'author'])
      .sortBy('createdAt', 'asc')
      .fetch()

    return {
      articles
    }
  }
}
</script>
我們的 articles 現在就如同其他任何的 data 屬性,所以可以直接拿來 template v-for 使用,就直接將文章的 title, author name, decription date, img 列出,並用 <NuxtLink> 連結到該 slug 文章。
pages/index.vue
<template>
  <div>
    <h1>Blog Posts</h1>
    <ul>
      <li v-for="article of articles" :key="article.slug">
        <NuxtLink :to="{ name: 'blog-slug', params: { slug: article.slug } }">
          <img :src="article.img" />
          <div>
            <h2>{{ article.title }}</h2>
            <p>by {{ article.author.name }}</p>
            <p>{{ article.description }}</p>
          </div>
        </NuxtLink>
      </li>
    </ul>
  </div>
</template>
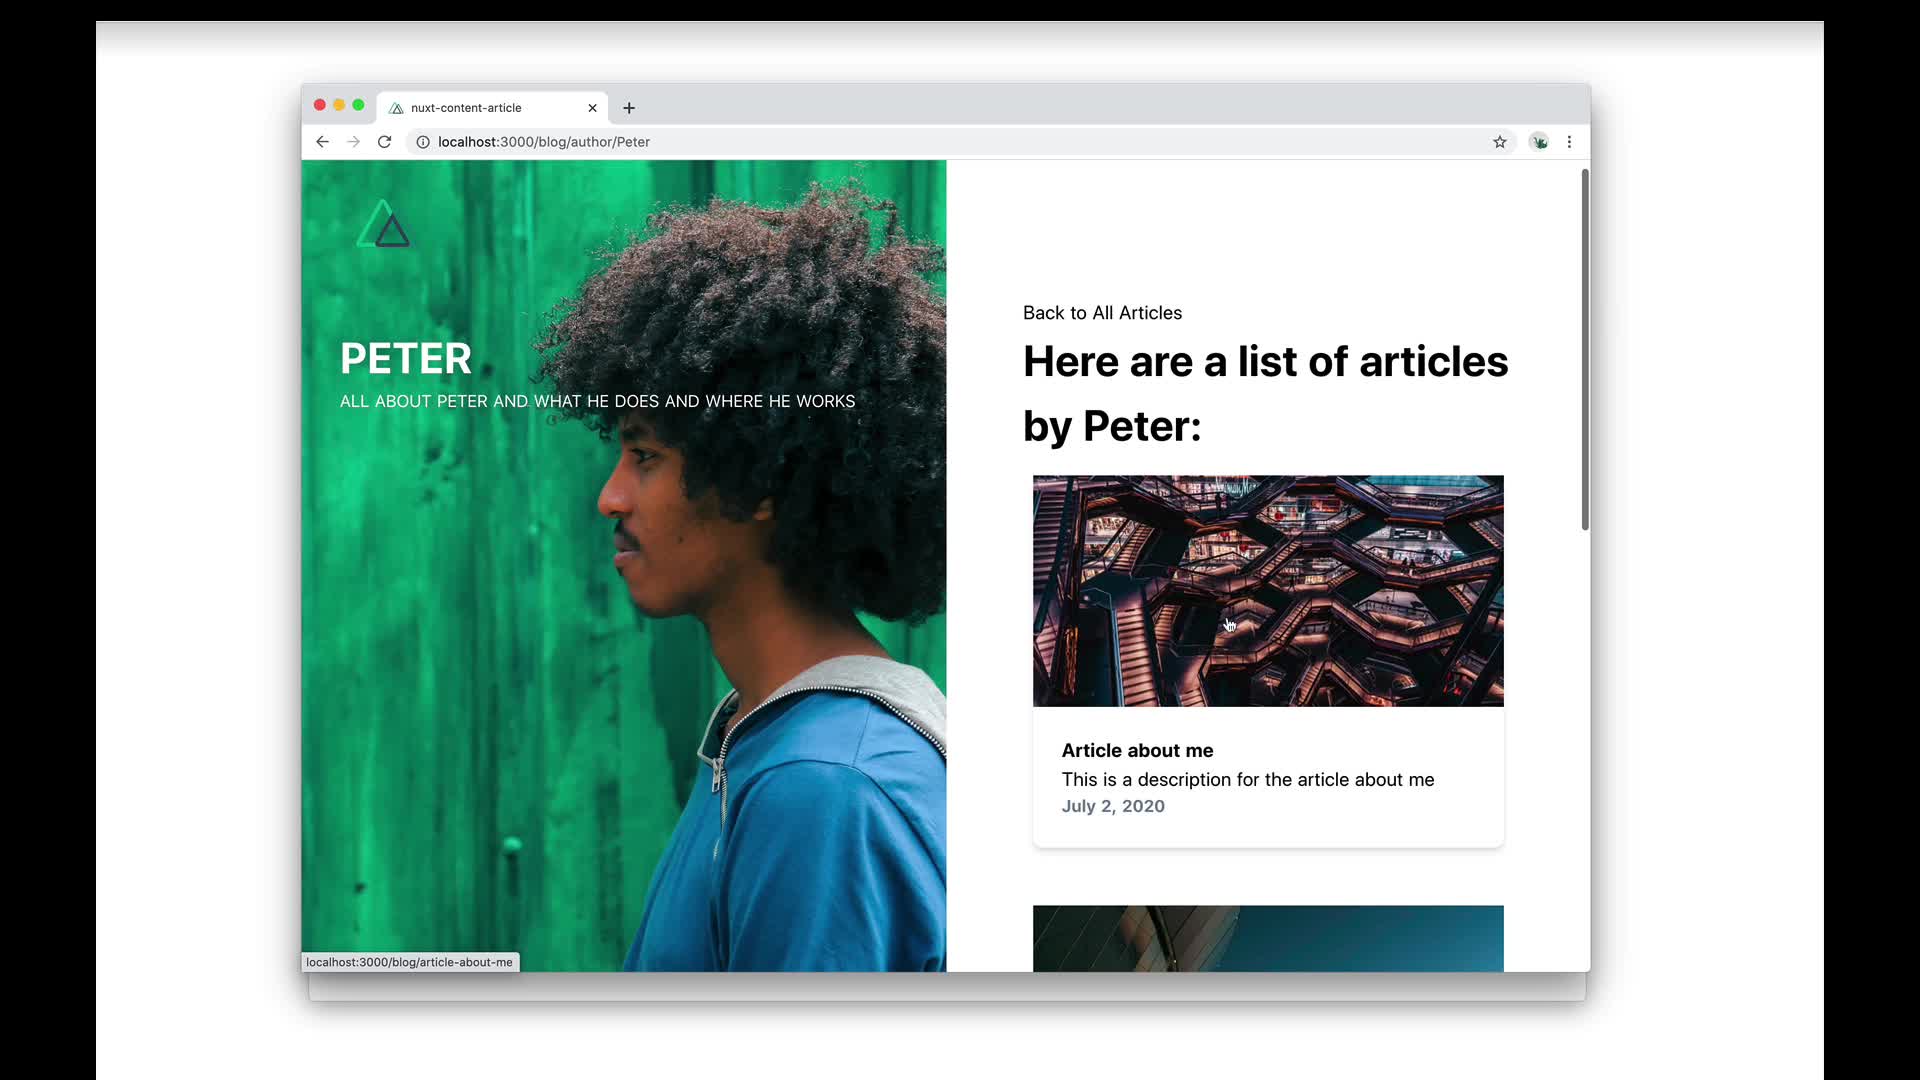
Using the where query to create an Author page
在 content module 裡我們可以用 where() 來過濾我們要的結果,我們可以有一個作者頁面,顯示該作者的細節以及所有該作者文章。
touch pages/blog/author/_author.vue
就像我們之前在 asyncData 中 fetch() 文章一樣,但這次新增個 where() 來拿到從 params 來的作者的文章。
舉例來說:
http://localhost:3000/_content/articles?author.name=Maria
因為我們的 author 是一個 object,想要直接 query 他的屬性的話,必須要在 nuxt.config.js 檔案中新增 nestedProperties。
nuxt.config.js
export default {
  content: {
    nestedProperties: [
      'author.name'
    ]
  }
}
如同前面所見,我們想要 query 作者 Maria 所以我們要在 $regex 中添加大小寫注意的參數。
接著我們要拿到相關細節資料,在上一個範例中,我們用 only() 來決定要回傳的屬性,但其實如果要回傳的偏多,可以用 without() 來決定不要拿到啥就好。
pages/blog/author/_author.vue
<script>
export default {
  async asyncData({ $content, params }) {
    const articles = await $content('articles', params.slug)
      .where({
        'author.name': {
          $regex: [params.author, 'i']
        }
      })
      .without('body')
      .sortBy('createdAt', 'asc')
      .fetch()

    return {
      articles
    }
  }
}
</script>
你可以用 array 來傳多個參數進去
without()方法裡。
without(['body', 'title])
現在可以用回傳的資料來顯示個有作者名稱和簡介以及他的全部文章的作者頁面
Bio: {{ articles[0].author.bio }} {{ article.description }} {{ formatDate(article.updatedAt) }}pages/blog/author/_author.vue
Author: {{ articles[0].author.name }}
Here are a list of articles by {{ articles[0].author.name }}:
{{ article.title }}
所有的 style 都從範例中移除了,你可以自己 style 或是從 demo code 複製。
接著我們要從 blog 頁面連接到作者頁面
components/Author.vue
<NuxtLink :to="`/blog/author/${author.name}`">
  <img :src="author.img" />
  <div>
    <h4>Author</h4>
    <p>{{ author.name }}</p>
    <p>{{ author.bio }}</p>
  </div>
</NuxtLink>
Add a search field
Nuxt content module 也給了我們搜尋的能力,只要使用它的 search() 方法。
首先先建立一個搜尋 component
touch components/AppSearchInput.vue
我們新增一個開始是空字串以及空陣列的資料屬性 searchQuery 和 articles,接著我們使用 watch,當使用者輸入 searchQuery 時去 search() $content。
components/AppSearchInput.vue
<script>
export default {
  data() {
    return {
      searchQuery: '',
      articles: []
    }
  },
  watch: {
    async searchQuery(searchQuery) {
      if (!searchQuery) {
        this.articles = []
        return
      }
      this.articles = await this.$content('articles')
        .limit(6)
        .search(searchQuery)
        .fetch()
    }
  }
}
</script>
接下來我們需要在 template 中用 v-model 連接 searchQuery 屬性以及如果有 query 出的文章,我們用 v-for 來羅列出文章並用 <NuxtLink> 連結過去。
components/AppSearchInput.vue
<template>
  <div>
    <input
      v-model="searchQuery"
      type="search"
      autocomplete="off"
      placeholder="Search Articles"
    />
    <ul v-if="articles.length">
      <li v-for="article of articles" :key="article.slug">
        <NuxtLink :to="{ name: 'blog-slug', params: { slug: article.slug } }">
          {{ article.title }}
        </NuxtLink>
      </li>
    </ul>
  </div>
</template>
這樣這個 component 就能用在頁面任何地方。
page/_slug.vue
<AppSearchInput />
Live editing our content
我們的 blog 看起來已經相當不錯了,如果我們想要修改內容,只要在頁面裡點兩下就好,content module 支援 live edit,點完修改就會自動存回檔案裡。
Generating our content
如果接下來我們想要 deploy 我們的新 blog,只要執行 nuxt build 和 nuxt export 指令即可。
Conclusion
處理內容真的很有趣,以及還有很多額外的東西可以建立,別忘了到我們的 discord 群的 showcase 頻道分享你的成品,或是到這裡訂閱我們的新聞郵件,會有更多額外的 NuxtJS 消息。
譯者註:本篇內容其實蠻詳細的,原文會把要用的方法,資料屬性都清楚的講一遍,而且還有線上的範例以及 code,對於從零開始建立 blog 蠻有幫助的!